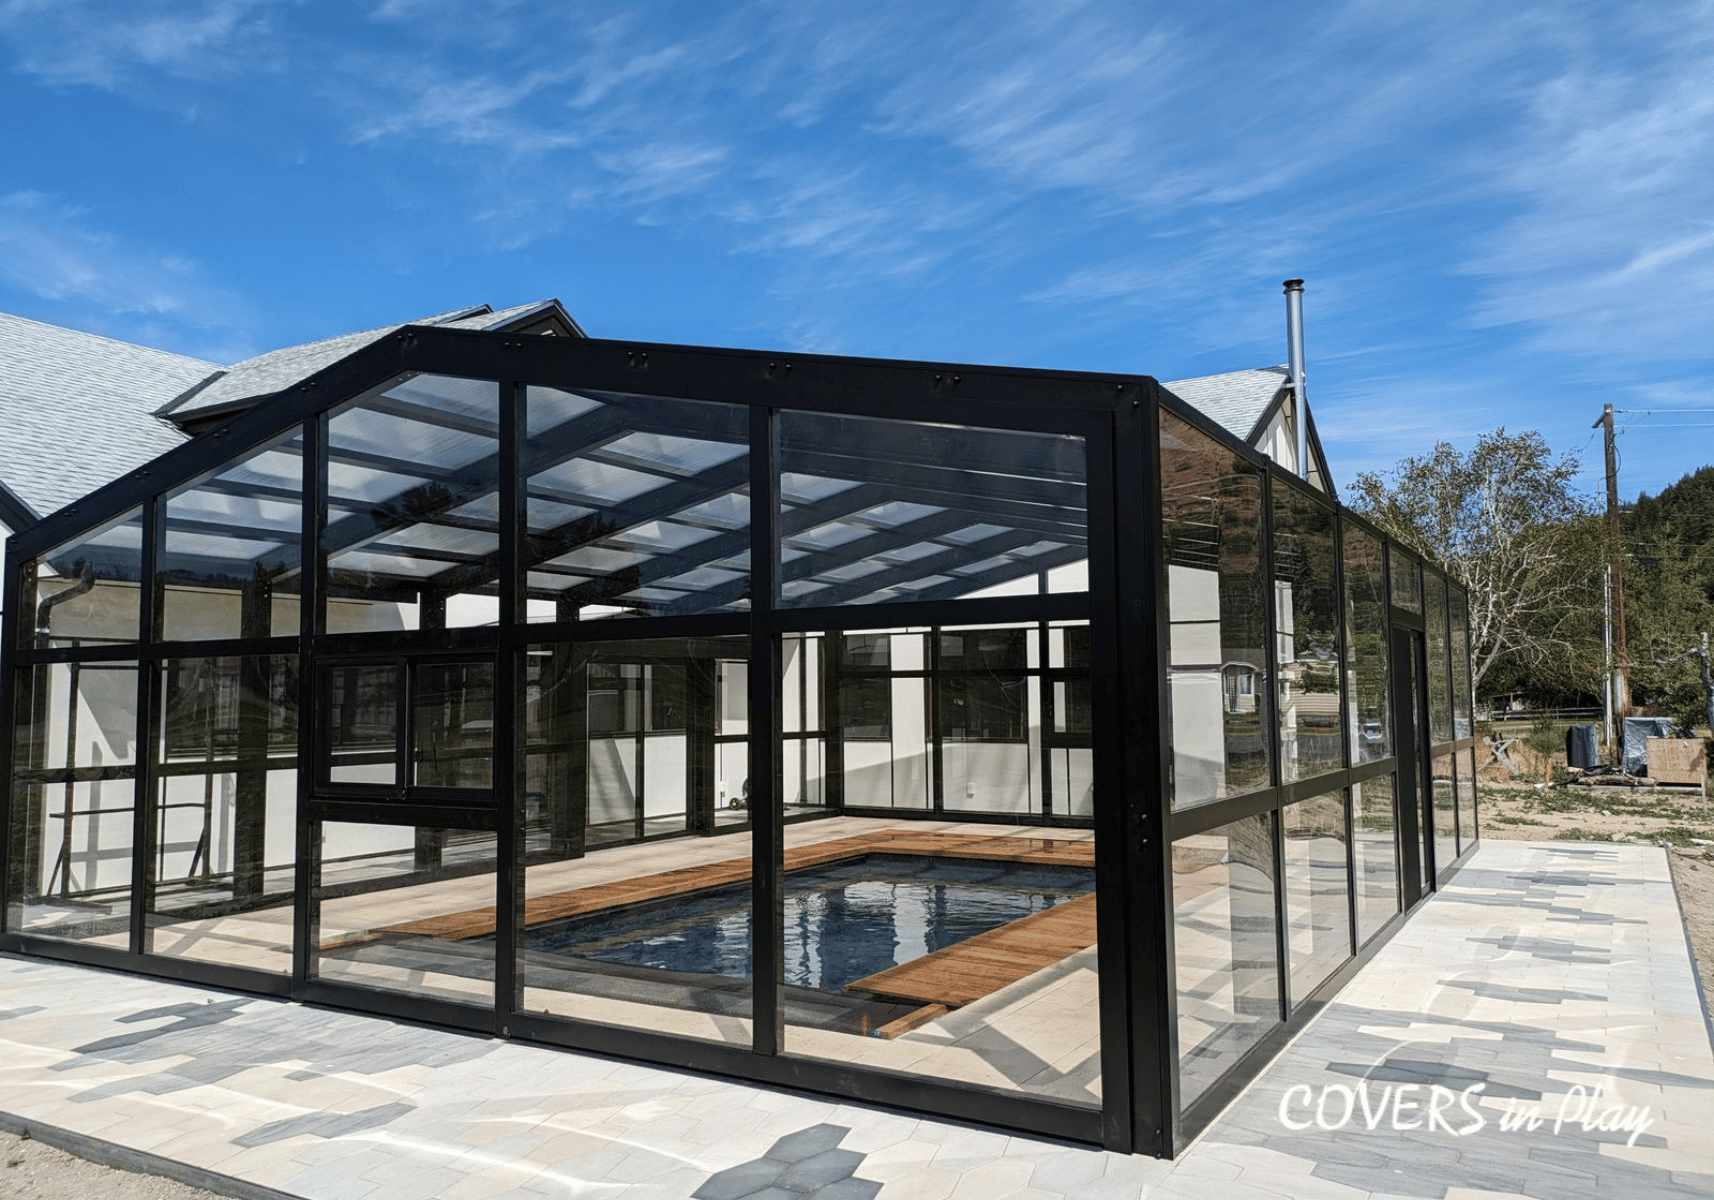
If you’re weighing “important criteria,” here’s why they matter: an enclosure isn’t just a cover; it creates a microclimate, secures access, and adds living space. Done right, you swim 9–12 months, skim fewer leaves, and boost property appeal. Done wrong, you fight condensation, stale air, and surprise energy bills. We’ve seen winter pools hold 82°F water with roughly 30–50% less heat loss when insulated panels and tight seals are chosen.
Think about daily life. Can your kids enter only through a lockable door? Will you open it in 20 seconds before work, or wrestle with it for five minutes and stop using it by February? In summer, the right vents and tints keep July afternoons 5–10°F cooler; in January, airtight frames reduce condensation on glass and rails. Neglect those details and you trade safety and comfort for fogged panels, chlorine smell, and higher utility bills.
From here, we’ll give you a clear decision framework, practical side‑by‑side comparisons, and a step‑by‑step path that avoids the common pitfalls so you can choose with confidence. First, a simple way to think about form, function, and climate.
Let’s start with the simple model we promised: form, function, and climate translated into three lenses you can actually use: lifestyle, environment, and compliance (permits and code rules). The best enclosure lives where those overlap, not in a single feature or the lowest price. Lifestyle covers how you swim, lounge, and move daily. Environment means wind, snow, sun, and site grading. Compliance sets guardrails like setbacks, heights, egress (safe exits), and safety glazing. Align all three, and everything snaps into place.
Example: your winter wind comes from the north at 25–35 mph; that pushes you toward higher wind ratings, leeward doors (on the downwind side), and stronger anchorage. Summer sun from the west? Consider tints, overhangs, and multiwall polycarbonate (insulated plastic panels) to temper late‑day heat. Permit caps height at 10 feet and requires two exits? That narrows profile choices and door locations immediately. Each lens removes guesswork and quickly trims options you shouldn’t waste time or money considering.
When one lens dominates, trouble follows. Pick for looks or price alone and you’ll feel it later wrong height, foggy glazing, stuffy air, or a structure that isn’t rated for your snow and wind. Let’s surface the common pitfalls so you can sidestep them upfront.
Underestimating wind and snow loads leads to flexing panels and rattling; always verify stamped engineering (an engineer’s signed calculations) for your address. Choosing a low profile for a lounge pool makes crouching the default. Cheap glazing can yellow or turn brittle under UV within a few seasons. Weak ventilation traps chloramines (pool odour) and moisture, causing condensation and mildew. Heavy, sticky tracks mean you open it less. Skipping setbacks and permits risks fines and redesign. Ignoring lifetime costs multiplies regret.
Maintenance surprises pile up: sand and maple seeds collect in tracks, grinding rollers unless you brush them weekly in peak seasons. Poor insulation means higher heating bills and wider water‑chemistry swings. Door placement that ignores furniture and grill zones causes traffic jams. Missing emergency egress (a second clear exit) delays permits. Thresholds without drainage send splash and rain back toward your slab and doors. Each issue is fixable up front with the right spec, but expensive once built.
Picture a chilly October morning: panes fog so thick you can’t see the deep end, drips tapping the deck. You slide a segment, it binds, and you scrape knuckles coaxing it past grit. The permit you skipped stalls a planned partyinspection backlog adds six weeks. Then a February windstorm hits; an under‑rated panel cracks at a corner and whistles all night. None of this is theoretical. We’ve been called to rescue projects that started with a brochure and no plan.
These mistakes stack. Wrong height plus weak ventilation = a sauna in July and a cold box in October. Add under‑rated loads and sticky tracks, and you stop using it. Pile on permit issues, and time and money vanish fast.
Most shoppers fixate on one shiny attribute price, a photo, or “fully automatic” and miss constraints like snow/wind ratings, track design, and ventilation. Spec sheets look impressive, but numbers without context mislead. A U‑value (insulation rating) that’s great in Phoenix may underperform in Buffalo. Better approach: start with how you’ll use it daily, then map your climate loads and site realities. That instantly narrows height, materials, and operation choices to a shortlist that actually works for you.
Think lifecycle, not just install day. Can you replace a cracked panel in 10 years with the same gasket profile? Is there service access for motors without disassembling half the frame? How many pounds of force to move a segment after a windblown week of grit? When we layer your energy costs, maintenance time, and local serviceability on top of loads and layout, half the catalog disappears. What’s left is the right 2–3 options, tailored to how you actually live.
Next, we’ll use a criteria‑driven framework that orders decisions from most constraining (loads, height, structure) to most flexible (finishes, colors). It turns a noisy marketplace into a clear scorecard you can trust—and it’s how we design enclosures that get used daily.
You asked for a clear scorecard; here it is ordered from must‑meet constraints to nice‑to‑have preferences. Weigh each against your routine and climate. Example: heavy snow bumps loads; desert sun shifts glazing. First up next: height.
We said height comes first—here’s a quick side‑by‑side. Picture a solo lap swimmer, family hangouts, or an all‑season room; match the row to your routine now, glazing and materials next.
| Height Type | Best For | Swim While Closed | Pros | Considerations | Relative Budget |
|---|---|---|---|---|---|
| Low | Minimal visual impact, maximum heat retention | Sometimes (model-dependent) | Sleek look, warms water faster, lowest cost | Not walkable; crouch access; limited social use | $ |
| Medium | Swim-while-closed, balanced views, compact yards | Yes | Usable shoulder seasons; single-person operation | Edges may limit standing height; plan door swings | $ |
| High | Year-round room, gatherings, furniture zones | Yes | Full walkability; entertain inside; clear sightlines | Higher cost; more permitting; greater visual presence | $$ |
With height and budget ($–$$) set, materials, frame, hardware, and glazing now determine strength, UV (ultraviolet) stability, clarity, cleaning effort, and lifespan; pick smart here, and we’ll validate loads and codes in the next step.
| Component | Top Options | Best For | Key Trade-offs |
|---|---|---|---|
| Frame | Powder-coated aluminum | Corrosion resistance, low maintenance | Color matching vs. heat absorption in dark tones |
| Fasteners/Hardware | Stainless steel (marine-grade where needed) | Coastal or high-humidity installs | Cost vs. longevity and corrosion control |
| Glazing (Multiwall polycarbonate) | 8–16 mm UV (ultraviolet)-stabilized polycarbonate | Insulation, impact resistance | Slightly diffused clarity vs. excellent strength-to-weight |
| Glazing (Solid) | Clear solid polycarbonate/acrylic | Maximum clarity, showpiece installs | Heavier, may scratch more easily—needs care |
Ask for panel warranties in writing 10 years is typical. We specify UV-stabilized faces on both sides to prevent yellowing. Clean with water and mild soap only; avoid abrasives or solvents to protect coatings and clarity.
You’ve chosen glazing that lasts; now confirm the structure is rated for where you live. Loads shift block to block hilltops get 20–30 mph (miles per hour) gusts, low yards collect drifting snow, and salt air bites hardware. Stamped drawings (engineer‑sealed) and permits protect you, prove capacity, speed approvals, and keep insurance simple. Next, we’ll plan airflow and moisture.
Use this quick verification checklist with your contractor or building department it’s the sequence we run before engineering your enclosure.
You planned drainage and thresholds; now make the air behave. Cross‑ventilation (openings on opposite sides) plus ridge and side vents lets warm, humid air escape fast. Use operable panels/doors daily; a 20‑second crack on both sides creates a gentle flow. On cold mornings, condensation (water on cool panels) is normal, vent high, wipe key areas, and run a small fan. For indoor pools, add a dehumidifier (moisture‑removal unit) and aim for 50–60% indoor humidity.
Place lower inlets toward the windward side (where wind hits) and high outlets on the leeward side (downwind) to harness breezes. Insulated glazing and thermal breaks (parts that slow heat transfer) keep interior surfaces warmer, reducing fog. In wetter climates, protect materials: specify marine‑grade fasteners and sealed tracks, and keep chlorine off aluminum with quick rinses. Tune airflow for 2–4 air changes per hour (ACH, full room air swaps) in active swim periods. Next: effortless operation.
Provide a simple design checklist to minimize fogging and mildew.
You protected materials with corrosion‑resistant hardware; now make opening and closing effortless. Manual sliding works for small, low profiles on calm days, but add segment size, wind, or a little grit in the tracks and effort spikes fast. Powered operation changes the routine: turn a key and each section glides smoothly. Our patented automated drive spreads force evenly along the frame, so one person moves the enclosure without wrestling, and built‑in interlocks keep motion controlled and predictable.
Safety and reliability are the deciders. We integrate obstacle sensing (stops on contact), keyed lockout (for kids), and sealed tracks that resist debris, which cuts wear over years. Real‑world example: a medium enclosure that took two adults five minutes to shift manually now opens in about 30–45 seconds per bay with a key switch or remote. Lose power? You can disengage to manual. Prefer automation? Add handheld remotes and optional smart controls for predictable, daily use.
Don’t need full walls? For patios or partial spans, consider a retractable roof same smooth automation overhead, open sky on demand, and a lighter footprint.
If a retractable roof won’t fit your site or your pool is circular or spa-centric a dome sheds snow naturally, handles 360-degree winds, and fits tight footprints. They open/close quickly and avoid corners where debris piles up. Rectangular or lean-to customs align to rooflines and setbacks, give linear lanes, and simplify door placement; either way, we’ll address safety and code next.
Explore our retractable pool dome enclosures for designs, dimensions, and engineering notes—ideal for round pools, wind-exposed sites, and spa combos.
Whether you choose a dome or a custom lean‑to, safety starts at the edges. We use lockable segments with keyed doors, safety glazing (impact‑resistant panels), low thresholds with drainage, and anti‑lift retainers that keep sections seated in gusts. Tie into your existing door alarms and gate locks if you have them, so kids and pets can’t wander in. Fully closed and latched is the safest state in that mode, sections interlock and resist prying and uplift.
We also plan emergency egress (a second safe exit) and, where required, two clear ways out. Sightlines matter transparent panels and smart mullion spacing keep lifeguard and parent views unobstructed. We secure controls in a lockable cabinet and place key switches above reach for kids. All of it aligns with local pool‑barrier, door‑hardware, and egress codes, so approvals and inspections are straightforward.
With approvals and inspections straightforward, the next step is making it look like it belongs. Start with color: match frame and trims to your window and door finishes—often a warm bronze, black, or a custom RAL tone. Align rooflines so the enclosure tucks under eaves cleanly and doesn’t block second‑floor views. Plan the threshold transition: flush where possible, with a narrow drainage slot to move water away. From inside, keep mullions thin at eye level to preserve horizon views. Add low landscape lighting for evening glow, not glare.
Continue the visual line underfoot. Carry your patio material into the enclosure same paver size and grout color or add a simple border to signal wet vs. dry zones. Place primary doors where you already walk: near the kitchen slider or grill, with clear 36–42 inch swings. For privacy, use tint or patterned panels on the neighbor side without darkening the whole space. Manage glare with light‑gray tints, exterior shades, or a slim pergola bay on the west. Planning a hotel or community? We’ll flag extra requirements next.
Planning beyond the pool? Explore our patio enclosures to coordinate roofing lines, lighting, and circulation so the entire outdoor room feels intentional.
Planning beyond the pool for a hotel or community? The playbook changes. We upgrade hardware for duty cycles you can count on oversized rollers, reinforced tracks, and hinges rated for 10,000+ moves. Add access control with keyed or carded entries and clear ADA (Americans with Disabilities Act) routes: 36-inch paths and 1:12 ramps (one inch rise per foot). Build staffing into operation: morning open, evening close, daily wipe-downs, weekly track brushing. Expect uptime targets, RFP-friendly specs (request for proposal), stamped drawings, and a COI (certificate of insurance) naming the owner.
Traffic surges are real: a 5 pm swim block can move 40–60 guests in 10 minutes, so doors, latches, and thresholds must flow without bottlenecks. Choose finishes that survive cleaners and humidity powder‑coated aluminum and marine‑grade stainless. Keep a spare‑parts kit on site: rollers, gaskets, door hardware, and a motor controller. Log openings/closings and weekly safety checks; inspectors appreciate records. Coordinate a pre‑inspection walk with the AHJ (authority having jurisdiction) and health department so there are no surprises on opening day.
See our commercial pool enclosures for specs, photos, and case studies tailored to hotels, communities, schools, and clubs—useful for budgeting and coordination.
Whether yours is residential or commercial, the question is TCO—what it costs to own, not just buy. Drivers: materials, geometry, automation, permitting, installation, maintenance. Example: medium height vs. high can swing capex 20–40%. Budget smart—then we’ll map stepwise buying process.
| Cost Factor | What Drives It | How to Optimize |
|---|---|---|
| Height/Geometry | Walkability, clear spans, custom curves and corners | Right-size height; modularize spans; avoid unnecessary custom curves |
| Materials | Frame profile, glazing type/thickness, hardware grade and coatings | Choose durable coatings; match glazing to climate and use |
| Automation | Drive system, controls, safety interlocks, wiring and power | Automate what improves daily use and safety; skip extras |
| Permitting/Engineering | Engineer stamps, review timelines, inspections, revisions, resubmittals | Engage early; submit complete drawings and load data |
| Maintenance | Cleaning time, seals/gaskets, rollers, track debris, spare parts | Plan annual service; choose accessible tracks and common parts |
Note: Avoid false economies. Cutting ventilation, lowering hardware grade, or skipping corrosion protection saves hundreds now but costs thousands later in comfort, downtime, and repairs. Aim for low operating costs over 10–20 years; that’s where value shows.
You’re aiming for low operating costs over 10–20 years—here’s our step‑by‑step to turn that TCO mindset into an on‑time install with fewer surprises. Timeline: 8–12 weeks to first swim; next comes a quick case snapshot.
Right after the handover and quick operation training, here’s how one project played out. This suburban pool sat idle nine months a year; now it’s a four‑season habit. We chose a medium‑height retractable enclosure, insulated multiwall polycarbonate (honeycomb plastic panels that trap heat), cross‑vent windows, and our patented automated drive. From first consult to first swim was 10 weeks, and the family now keeps water at 82°F with steadier chemistry and far less debris—think minutes to skim, not half an hour.
Daily life changed too. Mornings, a turn of the key moves each section in about 40 seconds; two vents cracked keep air fresh without a chlorine smell. Kids can’t slip in doors are lockable and the structure is engineer stamped for local snow and wind. On storm days they swim anyway, warm and clear, while the heater runs fewer hours and test strips stay in the good range longer. Wondering if it works on your site and climate? We answer the big questions next.
You asked if this will work on your site and climate; here are quick, practical answers we give every week so you can plan with confidence before a consult.
Since you can add automation, vents, or tints later, the smartest first step is a complimentary design consultation (a $500 value) to map the right footprint and loads. We’ll review your goals, show our patented automated drive, and explain what our 20‑year warranty actually covers. Email rough measurements, site photos, and your climate/location. We’ll turn that into a concept plan, a preliminary load check, and a clear budget range—so you know exactly what will work on your site.
Permitting and timelines feel murky. We make them predictable. Our team prepares engineer‑stamped drawings, coordinates code/permit submittals, and outlines anchorage and drainage details for your contractor. Typical cadence: permit approvals in 2–8 weeks, fabrication in 3–6 weeks, and installation in 3–5 days depending on size. You’ll get a single timeline with dates, not guesses. Prefer phased decisions? We can lock critical dimensions now and finalize finishes after you see samples.
Want ideas before we talk? Browse our pool enclosure hub for models, photos, and specs then bring favorites to your consult.

 905-589-3000